Wednesday, December 24, 2014

Yum local Server configuraion in Redhat linux

How to configure a YUM local server :

Step 1 : Copy the Server folder from redhat CD to the system

# mount /dev/cdrom /mnt
# mkdir /backup
# cp -ruv /mnt/Server /backup/.


Step 2 : Install the vsftpd package from CD

# cd /backup/Server
# rpm -ivh vsftpd*
# service vsftpd restart

Step 3 : Move all the RPM packages from /backup To /var/ftp/pub fro accessing the rpm's via FTP

# mv /backup/Server


Friday, December 19, 2014

How to Install Roundcube Webmail on Linux/CentOs


Server Requirements:-

    * Apache webserver
    * PHP Version 5.2.1 or greater
    * MySQL, PostgreSQL, SQLite or MSSQL database
    * An IMAP server which supports IMAP4 rev1
    * An SMTP server (recommended) or PHP configured for mail delivery

    * OS - CentOs


Installation Procedure:

     Download the latest stable version of RoundCube web mail from http://www.roundcube.net and copy it to your web server.

Link : http://liquidtelecom.dl.sourceforge.net/project/roundcubemail/roundcubemail/0.8.5/


1) Roundcube Webmail installation:

Login to your Apache server host through shell (putty)
Un tar roundcubemail-0.3.1.tar.gz in the web root directory


# tar -xvzf roundcubemail-0.3.1.tar.gz -C /var/www/html/
# cd /var/www/html
# mv roundcubemail-0.3.1/ roundcubemail
# cd roundcubemail/


RoundCube needs to save some temp files and it also writes logs. Therefore make sure that the following directories (temp,logs) are writable by the web server user


#chown -R apache.apache logs temp


Configuration:

2) Mysql configuration:

Login to your mysql server through shell (or webmin) and Create a database for your webmail (You can use the same server for both Apache and MySQL)

Example: db name - roundcubedb, username - roundcubeuser , password - roundcubepwd (your choice)


#mysql -u root -p ( enter the mysql root password)
mysql> create database 
roundcubedb;
mysql> grant all privileges on 
roundcubedb.* to roundcubeuser@localhost identified by 'roundcubepwd';
mysql> FLUSH PRIVILEGES;
mysql> exit


Above commands will create a database roundcubedb with the required permissions.
If you are ruining Apache and mysql in different servers, you have to grand privilege for roundcubeuser@apacheserverip.
Now import the table layout


#mysql roundcubedb < SQL/mysql.initial.sql  -u root -p
(enter the root password or mysql server)
Create the config file from samples


#cd config/
#cp db.inc.php.dist db.inc.php
#cp main.inc.php.dist main.inc.php


Edit Database Configuration File:

Edit the db.inc.php file and replace the below lines with your database access details

#vim db.inc.php
$rcmail_config['db_dsnw'] = 'mysql://roundcubeuser:roundcubepwd@localhost/roundcubedb';


3) Apache Server Configuration:

DNS Configuration:
Add dns entry for your support website ( webmail.example.com to 192.168.1.X (replace with your ip) )
If you don't have dns server already running, you can use the ip directly

Edit Apache Config:


edit /etc/httpd/conf/httpd.conf and add the following configurations
< VirtualHost 192.168.1.3:* >
DocumentRoot /var/www/html/roundcubemail
ServerName webmail.example.com
RewriteEngine on
RewriteCond %{REQUEST_METHOD} ^(TRACE|TRACK)
RewriteRule .* - [F]
    < Directory "/var/www/html/roundcubemail"  >
        DirectoryIndex index.php
    < /Directory >
Options ExecCGI
< /VirtualHost >


If you don't have DNS server you can skip the above step

and add alias for this mail directory

#vim /etc/httpd/conf/httpd.conf


Alias /webmail "/var/www/html/roundcubemail"

Restart apache server


Other wise add the roundcubemail document path here : 
#vim /etc/httpd/conf/httpd.conf
DocumentRoot "/var/www/html/roundcubemail"
:wq!

#service httpd restart


4) Installer config:

Edit main.inc.php file and enable the installer and check all the required modules are present, php config, etc

# vim main.inc.php
$rcmail_config['enable_installer'] = true;


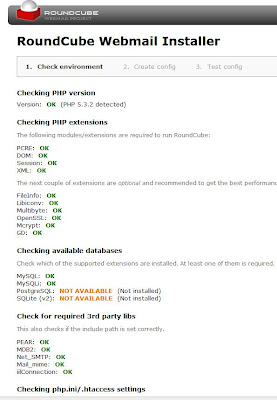
Now you can Point your browser to http://url-to-roundcube/installer/ (http://192.168.1.X/webmail/installer).


After checking this installer script you can disable  the installer 

#vim main.inc.php
$rcmail_config['enable_installer'] = false;


Now you can start using your webmail through browse 
your webmail url http://webmail.example.com  or ip (from remote computer)
If no dns server configured , use alias http://192.168.1.X/webmail ( from local host http://localhost/webmail)


Here you can enter your username, password, mail server details and start browsing your mails 


You can start using the webmail with the above configuration itself. Below I have mentioned optional configurations. 

A) Customizing the Configuration


IMAP server configuration:
By default the login screen provides a text box where you need to enter the IMAP host which you want to connect to. If you dont want your users to enter the mailserver details, you can hide this by setting one fixed IMAP host address
#vim main.inc.php
$rcmail_config['default_host'] = 'yourmailserverip';
$rcmail_config['smtp_server'] = 'yourmailserverip';

If you want to add multiple servers
$rcmail_config['default_host'] = array(
  'mail.example.com' => 'Default Server',
  'webmail.example.com' => 'Webmail Server',
  'ssl://mail.example.com:993' => 'Secure Webmail Server'


Deleted messages:

Some mail clients just mark messages as deleted and finally remove them when leaving the application. RoundCube by default move messages to the Trash folder when hitting the delete button. However this behavior can be changed by unsetting the 'trash_mbox' property and enabling 'flag_for_deletion'. Your configuration could look like this:
$rcmail_config['trash_mbox'] = '';
$rcmail_config['flag_for_deletion'] = true;
$rcmail_config['skip_deleted'] = false;

Messages will now be marked as deleted which can be reverted again. To finally remove them, the user needs to click "Compact" below the folder list. 


B) Other Configurations:

PostgreSQL:
To use RoundCube with PostgreSQL support you have to follow these
simple steps, which have to be done as the postgres system user (or
which ever is the database superuser):
$ createuser roundcube
$ createdb -O roundcube -E UNICODE roundcubemail
$ psql roundcubemail
roundcubemail =# ALTER USER roundcube WITH PASSWORD 'the_new_password';
roundcubemail =# \c - roundcube
roundcubemail => \i SQL/postgres.initial.sql

All this has been tested with PostgreSQL 8.x and 7.4.x. Older
versions don't have a -O option for the createdb, so if you are
using that version you'll have to change ownership of the DB later. - See more at: http://linuxadmin.melberi.com/2010/07/roundcube-webmail-installation.html#sthash.OSwI7aYe.dpuf


*******************

Thursday, December 18, 2014

How do I edit a log message that I already committed in Subversion


Edit a log message that I already committed in Subversion on Linux :

You can use svn proedit command to edit the logs, But sometimes it will give an error like this : 
"svn: None of the environment variables SVN_EDITOR, VISUAL or EDITOR are set, and no 'editor-cmd' run-time configuration option was found"
So the solution is Set SVN_EDITOR Environment Variable To Vim.
Here the command to export the path :
# export SVN_EDITOR=vim
To permanently set this environment variable put the below line in your ~/.bash_profile file.
# export SVN_EDITOR=vim
Now you can edit the SVN log :
# svn propedit -r N --revprop svn:log URL
                         OR
# svn propset -r N --revprop svn:log "new log message" URL
Here N will be the Rev no
URL is your SVN path
When you run this propedit command, and just in case you see this message
"DAV request failed; it's possible that the repository's pre-revprop-change hook either failed or is non-existen"
Its because Subversion doesn't allow you to modify log messages because they are unversioned and will be lost permanently.
Go to the hooks directory on your Subversion server (replace ~/svn/reponame with the directory of your repository)
# cd ~/svn/reponame/hooks
Remove the extension
# mv pre-revprop-change.tmpl pre-revprop-change
Make it executable (cannot do chmod +x!)
#chmod 755 pre-revprop-change

Now edit, it will work..!
**************

How to Setup DNS Client configuration in Solaris


Solaris UNIX: How to Setup DNS Client configuration / name server 


DNS Client Setup in Solaris :-

First Create the file called /etc/resolv.conf - which includes the primary and secondary DNS server IP address for Solaris system, it can be your own DNS server or your ISPs DNS server:

Create resolv.conf file
# touch /etc/resolv.conf
Open /etc/resolv.conf using vi text editor:
# vi /etc/resolv.conf
Add the following lines to it:
nameserver 8.8.8.8
nameserver 4.4.4.4
Where,
nameserver IP : It is IP of first DNS server
Enable the name resolving using DNS as follows:
# cp /etc/nsswitch.dns /etc/nsswitch.conf

Test new name server by running the nslookup command as follows:

# ping google.com

you will get the below output : 
google.com is alive

*************

How to setup testopia-1.3-Beta with Bugzilla on CentOS

Testopia Installation In CentOS :-


Download the required Testopia add-on from the following location:

# wget http://mirror.internode.on.net/pub/mozilla/webtools/testopia/testopia-1.3-BETA2.tar.gz

Note :- Before patching, it is highly recommended that you have take a backup of Bugzilla directory and other configuration files

Copy the testopia-1.3-beta2.tar.gz source to /var/www/html/bugzilla/.
# cp –rv testopia-1.3-beta2.tar.gz /var/www/html/bugzilla/.

And extract it
# tar –xvzf testopia-1.3-beta2.tar.gz
Before to run the patch, you will have to install some perl module for Testopia patching :
Here the commands :


/usr/bin/perl -MCPAN -e 'install JSON'
/usr/bin/perl -MCPAN -e 'install Text::Diff'

Then run the Patch command:
# patch -p0 -i testopia/patch-3.0
Here need to give two times “no”
Note: Should give 2 times “no” then will work correctly.

Then run the checksetup.pl to fix the modules successfully..
#./checksetup.pl

Note :- 

After running ./checksetup.pl, it will convert your table storage format to UTF8. This allows Bugzilla to correctly store and sort international characters. However, if you have any non-UTF-8 data in your database,it ***WILL BE DELETED*** by this process. So, before you continue with checksetup.pl, if you have any non-UTF-8 data (or even if you're not sure) you should press Ctrl-C to interrupt checksetup.pl, and run contrib/recode.pl to make all data in your database into UTF-8. You should also back up your database before continuing. This will affect every single table in the database, even non-Bugzilla. If you ever used a version of Bugzilla before 2.22, we STRONGLY recommend that you stop checksetup.pl and run contrib/recode.pl.

Then restart the below services..

# service httpd restart
service mysqld restart

If there is no errors when you run the ./checksetup.pl. the configuration setup for Testopia is completed.

Now acces the Bugzilla and Testopia from any client PC.

*********

Install Bugzilla-3.0.2 on CentOS 6.3 step by step


Bugzilla-3.0.2 Setup on CentOs 6.3


Install required packages
 # yum install perl* httpd* mysql-server* mod_perl-devel –y

Download the bugzilla 3.0.2 (20xx/8)

 # cd /var/www/html
# tar zxvf bugzilla-3.0.2.tar.gz
# mv bugzilla-3.0.2 bugzilla

Start mysql server 
# service mysqld start
# chkconfig mysqld on 

Set mysql root password via mysql_secure_installation 
# sudo /usr/bin/mysql_secure_installation

Create a DB for bugzilla mysql login with root
# mysql -u root -p
> CREATE DATABASE bugs ;
> exit

Run checksetup script to find needed modules 
# ./checksetup.pl

Install required modules
#  /usr/bin/perl install-module.pl ––all
Note: If the above command is not working, need to install modules manually.

Following are the modules need to install manually,.
/usr/bin/perl -MCPAN -e 'install Email::Reply'
/usr/bin/perl -MCPAN -e 'install Email::MIME::Attachment::Stripper'
/usr/bin/perl -MCPAN -e 'install HTML::Scrubber'
/usr/bin/perl -MCPAN -e 'install Chart::Base'
/usr/bin/perl -MCPAN -e 'install PatchReader'
/usr/bin/perl -MCPAN -e 'install Apache::DBI'
or
/usr/bin/perl install-module.pl ––all

" Tips to resolve the dependency errors :-
If any modules still need to install / any failure message came from above commands/modules here is the solution to fix those….
 Fixing Issue:-
To install the required perl modules use the below command to execute correctly:
in /var/www/html/bugzilla terminal……
1) cpan
Then
2) install MIME::Parser < ----- This is the dependency package for Emails.
3) install Email::Reply
4) install Email::MIME::Attachment::Stripper "


Run checksetup script again to generate localconfig file 
# ./checksetup.pl

Modify localconfig  for  $db_name, $db_user and $db_pass based on previous settings 
# vi ./localconfig
$db_name = bugs
$db_user=root
$db_pass = abcdefg
Run checksetup script to set initial configuration
 # ./checksetup.pl

Apache setup, modify httpd.conf, append the following config : 
# vi /etc/httpd/conf/httpd.conf
<Directory /var/www/html/bugzilla>
AddHandler cgi-script .cgi
Options +Indexes +ExecCGI
DirectoryIndex index.cgi
AllowOverride Limit FileInfo Indexes
</Directory>


Restart Apache  
# service httpd restart
# chkconfig httpd on

Stopping SE linux and Iptables : 
# Setenforce 0
# Service iptables restart

Installing sendmail : 
# Yum install sendmail –y

That’s it, Open http://localhost/bugzilla or http://192.168.1.X/bugzilla and enjoy it :-


****************
Troubleshooting :-
1) Mysql-setup/configuration:-
In /etc/my.cnf file need to update
max_allowed_packet=4M
to
max_allowed_packet=1024G
2) MySQL-Bugzilla(bugs) data Restore Setup:-
Mysql –u root –p
Mysql:> Create database bugs;
Myql:> Use bugs;
Root@localhost:> mysql –u root –p bugs < bugs_bkp.xxxx.sql
Backup successfully restored…

****************

How to remove server field from Roundcube

Here the steps to remove the server field from roundube : 

Roundcube is web based open source multiuser IMAP client, 

After successfully installation I was able to see a new redesigned login window with a server field.


Edit your main config to fix this behavior:
File: config/main.inc.php
# replaced with line below $rcmail_config['default_host'] = '';
$rcmail_config['default_host'] = '127.0.0.1';
Refresh your page and the server field will disappear;)
******

Configure Linux as a Software Router with two interfaces - CentOS / Redhat


Configure Linux as a Software Router with two NIC


Linux can be easily configured to share an internet connection using iptables. All you need to have is, two network interface cards as follows:


a) Your internal (LAN) network connected via eth0 with static ip address 192.168.0.1

b) Your external WAN) network is connected via eth1 with static ip address 10.10.10.1  ( public IP provided by ISP )
Please note that interface eth1 may have public IP address or IP assigned by ISP. eth1 may be connected to a dedicated DSL / ADSL / WAN / Cable router:

Step # 1: Enable Packet Forwarding

Login as the root user. Open /etc/sysctl.conf file
# vi /etc/sysctl.conf

Add the following line to enable packet forwarding for IPv4:
net.ipv4.conf.default.forwarding=1

Save and close the file. Restart networking:
# service network restart

Step # 2: Enable IP masquerading


In Linux networking, Network Address Translation (NAT) or Network Masquerading (IP Masquerading) is a technique of transceiving network traffic through a router that involves re-writing the source and/or destination IP addresses and usually also the TCP/UDP port numbers of IP packets as they pass through. In short, IP masquerading is used to share the internet connection.


Share internet connection

To share network connection via eth1, enter the following rule at command prompt (following useful for ppp0 or dial up connection):


# service iptables stop

# iptables -t nat -A POSTROUTING -o eth1 -j MASQUERADE

# service iptables save

# service iptables restart

Make sure Iptables runs on boot

# chkconfig iptables on


Open your Windows / Mac / Linux computer networking GUI tool and point router IP to 192.168.0.1 (eth0 Linux IP). You also need to setup DNS IP such as 8.8.8.8 or to your local DNS server IP. You should now able to ping or browse the internet:

# ping google.com


Client Side Configuration

Now all you have to do is set the IP 192.168.0.1 as gateway on all your client machines in your network. You can enter  your default gateway in the file /etc/sysconfig/network as:- 
GATEWAY=192.168.0.1
or you can also put the same entry in your interface specific file at /etc/sysconfig/network-scripts/ifcfg-eth0 in case of RHEL/Centos or at /etc/network/interfaces in case of ubuntu.
- See more at: http://www.linuxtechtips.com/2013/12/configure-centos-as-a-router.html#sthash.bww4gbw1.dpuf

*****