Wednesday, December 24, 2014

Yum local Server configuraion in Redhat linux

How to configure a YUM local server :

Step 1 : Copy the Server folder from redhat CD to the system

# mount /dev/cdrom /mnt
# mkdir /backup
# cp -ruv /mnt/Server /backup/.


Step 2 : Install the vsftpd package from CD

# cd /backup/Server
# rpm -ivh vsftpd*
# service vsftpd restart

Step 3 : Move all the RPM packages from /backup To /var/ftp/pub fro accessing the rpm's via FTP

# mv /backup/Server


Friday, December 19, 2014

How to Install Roundcube Webmail on Linux/CentOs


Server Requirements:-

    * Apache webserver
    * PHP Version 5.2.1 or greater
    * MySQL, PostgreSQL, SQLite or MSSQL database
    * An IMAP server which supports IMAP4 rev1
    * An SMTP server (recommended) or PHP configured for mail delivery

    * OS - CentOs


Installation Procedure:

     Download the latest stable version of RoundCube web mail from http://www.roundcube.net and copy it to your web server.

Link : http://liquidtelecom.dl.sourceforge.net/project/roundcubemail/roundcubemail/0.8.5/


1) Roundcube Webmail installation:

Login to your Apache server host through shell (putty)
Un tar roundcubemail-0.3.1.tar.gz in the web root directory


# tar -xvzf roundcubemail-0.3.1.tar.gz -C /var/www/html/
# cd /var/www/html
# mv roundcubemail-0.3.1/ roundcubemail
# cd roundcubemail/


RoundCube needs to save some temp files and it also writes logs. Therefore make sure that the following directories (temp,logs) are writable by the web server user


#chown -R apache.apache logs temp


Configuration:

2) Mysql configuration:

Login to your mysql server through shell (or webmin) and Create a database for your webmail (You can use the same server for both Apache and MySQL)

Example: db name - roundcubedb, username - roundcubeuser , password - roundcubepwd (your choice)


#mysql -u root -p ( enter the mysql root password)
mysql> create database 
roundcubedb;
mysql> grant all privileges on 
roundcubedb.* to roundcubeuser@localhost identified by 'roundcubepwd';
mysql> FLUSH PRIVILEGES;
mysql> exit


Above commands will create a database roundcubedb with the required permissions.
If you are ruining Apache and mysql in different servers, you have to grand privilege for roundcubeuser@apacheserverip.
Now import the table layout


#mysql roundcubedb < SQL/mysql.initial.sql  -u root -p
(enter the root password or mysql server)
Create the config file from samples


#cd config/
#cp db.inc.php.dist db.inc.php
#cp main.inc.php.dist main.inc.php


Edit Database Configuration File:

Edit the db.inc.php file and replace the below lines with your database access details

#vim db.inc.php
$rcmail_config['db_dsnw'] = 'mysql://roundcubeuser:roundcubepwd@localhost/roundcubedb';


3) Apache Server Configuration:

DNS Configuration:
Add dns entry for your support website ( webmail.example.com to 192.168.1.X (replace with your ip) )
If you don't have dns server already running, you can use the ip directly

Edit Apache Config:


edit /etc/httpd/conf/httpd.conf and add the following configurations
< VirtualHost 192.168.1.3:* >
DocumentRoot /var/www/html/roundcubemail
ServerName webmail.example.com
RewriteEngine on
RewriteCond %{REQUEST_METHOD} ^(TRACE|TRACK)
RewriteRule .* - [F]
    < Directory "/var/www/html/roundcubemail"  >
        DirectoryIndex index.php
    < /Directory >
Options ExecCGI
< /VirtualHost >


If you don't have DNS server you can skip the above step

and add alias for this mail directory

#vim /etc/httpd/conf/httpd.conf


Alias /webmail "/var/www/html/roundcubemail"

Restart apache server


Other wise add the roundcubemail document path here : 
#vim /etc/httpd/conf/httpd.conf
DocumentRoot "/var/www/html/roundcubemail"
:wq!

#service httpd restart


4) Installer config:

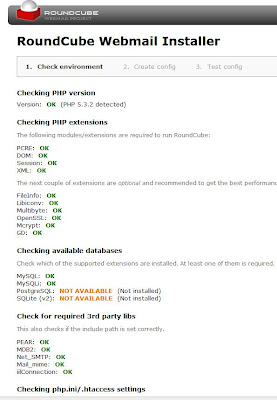
Edit main.inc.php file and enable the installer and check all the required modules are present, php config, etc

# vim main.inc.php
$rcmail_config['enable_installer'] = true;


Now you can Point your browser to http://url-to-roundcube/installer/ (http://192.168.1.X/webmail/installer).


After checking this installer script you can disable  the installer 

#vim main.inc.php
$rcmail_config['enable_installer'] = false;


Now you can start using your webmail through browse 
your webmail url http://webmail.example.com  or ip (from remote computer)
If no dns server configured , use alias http://192.168.1.X/webmail ( from local host http://localhost/webmail)


Here you can enter your username, password, mail server details and start browsing your mails 


You can start using the webmail with the above configuration itself. Below I have mentioned optional configurations. 

A) Customizing the Configuration


IMAP server configuration:
By default the login screen provides a text box where you need to enter the IMAP host which you want to connect to. If you dont want your users to enter the mailserver details, you can hide this by setting one fixed IMAP host address
#vim main.inc.php
$rcmail_config['default_host'] = 'yourmailserverip';
$rcmail_config['smtp_server'] = 'yourmailserverip';

If you want to add multiple servers
$rcmail_config['default_host'] = array(
  'mail.example.com' => 'Default Server',
  'webmail.example.com' => 'Webmail Server',
  'ssl://mail.example.com:993' => 'Secure Webmail Server'


Deleted messages:

Some mail clients just mark messages as deleted and finally remove them when leaving the application. RoundCube by default move messages to the Trash folder when hitting the delete button. However this behavior can be changed by unsetting the 'trash_mbox' property and enabling 'flag_for_deletion'. Your configuration could look like this:
$rcmail_config['trash_mbox'] = '';
$rcmail_config['flag_for_deletion'] = true;
$rcmail_config['skip_deleted'] = false;

Messages will now be marked as deleted which can be reverted again. To finally remove them, the user needs to click "Compact" below the folder list. 


B) Other Configurations:

PostgreSQL:
To use RoundCube with PostgreSQL support you have to follow these
simple steps, which have to be done as the postgres system user (or
which ever is the database superuser):
$ createuser roundcube
$ createdb -O roundcube -E UNICODE roundcubemail
$ psql roundcubemail
roundcubemail =# ALTER USER roundcube WITH PASSWORD 'the_new_password';
roundcubemail =# \c - roundcube
roundcubemail => \i SQL/postgres.initial.sql

All this has been tested with PostgreSQL 8.x and 7.4.x. Older
versions don't have a -O option for the createdb, so if you are
using that version you'll have to change ownership of the DB later. - See more at: http://linuxadmin.melberi.com/2010/07/roundcube-webmail-installation.html#sthash.OSwI7aYe.dpuf


*******************

Thursday, December 18, 2014

How do I edit a log message that I already committed in Subversion


Edit a log message that I already committed in Subversion on Linux :

You can use svn proedit command to edit the logs, But sometimes it will give an error like this : 
"svn: None of the environment variables SVN_EDITOR, VISUAL or EDITOR are set, and no 'editor-cmd' run-time configuration option was found"
So the solution is Set SVN_EDITOR Environment Variable To Vim.
Here the command to export the path :
# export SVN_EDITOR=vim
To permanently set this environment variable put the below line in your ~/.bash_profile file.
# export SVN_EDITOR=vim
Now you can edit the SVN log :
# svn propedit -r N --revprop svn:log URL
                         OR
# svn propset -r N --revprop svn:log "new log message" URL
Here N will be the Rev no
URL is your SVN path
When you run this propedit command, and just in case you see this message
"DAV request failed; it's possible that the repository's pre-revprop-change hook either failed or is non-existen"
Its because Subversion doesn't allow you to modify log messages because they are unversioned and will be lost permanently.
Go to the hooks directory on your Subversion server (replace ~/svn/reponame with the directory of your repository)
# cd ~/svn/reponame/hooks
Remove the extension
# mv pre-revprop-change.tmpl pre-revprop-change
Make it executable (cannot do chmod +x!)
#chmod 755 pre-revprop-change

Now edit, it will work..!
**************

How to Setup DNS Client configuration in Solaris


Solaris UNIX: How to Setup DNS Client configuration / name server 


DNS Client Setup in Solaris :-

First Create the file called /etc/resolv.conf - which includes the primary and secondary DNS server IP address for Solaris system, it can be your own DNS server or your ISPs DNS server:

Create resolv.conf file
# touch /etc/resolv.conf
Open /etc/resolv.conf using vi text editor:
# vi /etc/resolv.conf
Add the following lines to it:
nameserver 8.8.8.8
nameserver 4.4.4.4
Where,
nameserver IP : It is IP of first DNS server
Enable the name resolving using DNS as follows:
# cp /etc/nsswitch.dns /etc/nsswitch.conf

Test new name server by running the nslookup command as follows:

# ping google.com

you will get the below output : 
google.com is alive

*************

How to setup testopia-1.3-Beta with Bugzilla on CentOS

Testopia Installation In CentOS :-


Download the required Testopia add-on from the following location:

# wget http://mirror.internode.on.net/pub/mozilla/webtools/testopia/testopia-1.3-BETA2.tar.gz

Note :- Before patching, it is highly recommended that you have take a backup of Bugzilla directory and other configuration files

Copy the testopia-1.3-beta2.tar.gz source to /var/www/html/bugzilla/.
# cp –rv testopia-1.3-beta2.tar.gz /var/www/html/bugzilla/.

And extract it
# tar –xvzf testopia-1.3-beta2.tar.gz
Before to run the patch, you will have to install some perl module for Testopia patching :
Here the commands :


/usr/bin/perl -MCPAN -e 'install JSON'
/usr/bin/perl -MCPAN -e 'install Text::Diff'

Then run the Patch command:
# patch -p0 -i testopia/patch-3.0
Here need to give two times “no”
Note: Should give 2 times “no” then will work correctly.

Then run the checksetup.pl to fix the modules successfully..
#./checksetup.pl

Note :- 

After running ./checksetup.pl, it will convert your table storage format to UTF8. This allows Bugzilla to correctly store and sort international characters. However, if you have any non-UTF-8 data in your database,it ***WILL BE DELETED*** by this process. So, before you continue with checksetup.pl, if you have any non-UTF-8 data (or even if you're not sure) you should press Ctrl-C to interrupt checksetup.pl, and run contrib/recode.pl to make all data in your database into UTF-8. You should also back up your database before continuing. This will affect every single table in the database, even non-Bugzilla. If you ever used a version of Bugzilla before 2.22, we STRONGLY recommend that you stop checksetup.pl and run contrib/recode.pl.

Then restart the below services..

# service httpd restart
service mysqld restart

If there is no errors when you run the ./checksetup.pl. the configuration setup for Testopia is completed.

Now acces the Bugzilla and Testopia from any client PC.

*********

Install Bugzilla-3.0.2 on CentOS 6.3 step by step


Bugzilla-3.0.2 Setup on CentOs 6.3


Install required packages
 # yum install perl* httpd* mysql-server* mod_perl-devel –y

Download the bugzilla 3.0.2 (20xx/8)

 # cd /var/www/html
# tar zxvf bugzilla-3.0.2.tar.gz
# mv bugzilla-3.0.2 bugzilla

Start mysql server 
# service mysqld start
# chkconfig mysqld on 

Set mysql root password via mysql_secure_installation 
# sudo /usr/bin/mysql_secure_installation

Create a DB for bugzilla mysql login with root
# mysql -u root -p
> CREATE DATABASE bugs ;
> exit

Run checksetup script to find needed modules 
# ./checksetup.pl

Install required modules
#  /usr/bin/perl install-module.pl ––all
Note: If the above command is not working, need to install modules manually.

Following are the modules need to install manually,.
/usr/bin/perl -MCPAN -e 'install Email::Reply'
/usr/bin/perl -MCPAN -e 'install Email::MIME::Attachment::Stripper'
/usr/bin/perl -MCPAN -e 'install HTML::Scrubber'
/usr/bin/perl -MCPAN -e 'install Chart::Base'
/usr/bin/perl -MCPAN -e 'install PatchReader'
/usr/bin/perl -MCPAN -e 'install Apache::DBI'
or
/usr/bin/perl install-module.pl ––all

" Tips to resolve the dependency errors :-
If any modules still need to install / any failure message came from above commands/modules here is the solution to fix those….
 Fixing Issue:-
To install the required perl modules use the below command to execute correctly:
in /var/www/html/bugzilla terminal……
1) cpan
Then
2) install MIME::Parser < ----- This is the dependency package for Emails.
3) install Email::Reply
4) install Email::MIME::Attachment::Stripper "


Run checksetup script again to generate localconfig file 
# ./checksetup.pl

Modify localconfig  for  $db_name, $db_user and $db_pass based on previous settings 
# vi ./localconfig
$db_name = bugs
$db_user=root
$db_pass = abcdefg
Run checksetup script to set initial configuration
 # ./checksetup.pl

Apache setup, modify httpd.conf, append the following config : 
# vi /etc/httpd/conf/httpd.conf
<Directory /var/www/html/bugzilla>
AddHandler cgi-script .cgi
Options +Indexes +ExecCGI
DirectoryIndex index.cgi
AllowOverride Limit FileInfo Indexes
</Directory>


Restart Apache  
# service httpd restart
# chkconfig httpd on

Stopping SE linux and Iptables : 
# Setenforce 0
# Service iptables restart

Installing sendmail : 
# Yum install sendmail –y

That’s it, Open http://localhost/bugzilla or http://192.168.1.X/bugzilla and enjoy it :-


****************
Troubleshooting :-
1) Mysql-setup/configuration:-
In /etc/my.cnf file need to update
max_allowed_packet=4M
to
max_allowed_packet=1024G
2) MySQL-Bugzilla(bugs) data Restore Setup:-
Mysql –u root –p
Mysql:> Create database bugs;
Myql:> Use bugs;
Root@localhost:> mysql –u root –p bugs < bugs_bkp.xxxx.sql
Backup successfully restored…

****************

How to remove server field from Roundcube

Here the steps to remove the server field from roundube : 

Roundcube is web based open source multiuser IMAP client, 

After successfully installation I was able to see a new redesigned login window with a server field.


Edit your main config to fix this behavior:
File: config/main.inc.php
# replaced with line below $rcmail_config['default_host'] = '';
$rcmail_config['default_host'] = '127.0.0.1';
Refresh your page and the server field will disappear;)
******

Configure Linux as a Software Router with two interfaces - CentOS / Redhat


Configure Linux as a Software Router with two NIC


Linux can be easily configured to share an internet connection using iptables. All you need to have is, two network interface cards as follows:


a) Your internal (LAN) network connected via eth0 with static ip address 192.168.0.1

b) Your external WAN) network is connected via eth1 with static ip address 10.10.10.1  ( public IP provided by ISP )
Please note that interface eth1 may have public IP address or IP assigned by ISP. eth1 may be connected to a dedicated DSL / ADSL / WAN / Cable router:

Step # 1: Enable Packet Forwarding

Login as the root user. Open /etc/sysctl.conf file
# vi /etc/sysctl.conf

Add the following line to enable packet forwarding for IPv4:
net.ipv4.conf.default.forwarding=1

Save and close the file. Restart networking:
# service network restart

Step # 2: Enable IP masquerading


In Linux networking, Network Address Translation (NAT) or Network Masquerading (IP Masquerading) is a technique of transceiving network traffic through a router that involves re-writing the source and/or destination IP addresses and usually also the TCP/UDP port numbers of IP packets as they pass through. In short, IP masquerading is used to share the internet connection.


Share internet connection

To share network connection via eth1, enter the following rule at command prompt (following useful for ppp0 or dial up connection):


# service iptables stop

# iptables -t nat -A POSTROUTING -o eth1 -j MASQUERADE

# service iptables save

# service iptables restart

Make sure Iptables runs on boot

# chkconfig iptables on


Open your Windows / Mac / Linux computer networking GUI tool and point router IP to 192.168.0.1 (eth0 Linux IP). You also need to setup DNS IP such as 8.8.8.8 or to your local DNS server IP. You should now able to ping or browse the internet:

# ping google.com


Client Side Configuration

Now all you have to do is set the IP 192.168.0.1 as gateway on all your client machines in your network. You can enter  your default gateway in the file /etc/sysconfig/network as:- 
GATEWAY=192.168.0.1
or you can also put the same entry in your interface specific file at /etc/sysconfig/network-scripts/ifcfg-eth0 in case of RHEL/Centos or at /etc/network/interfaces in case of ubuntu.
- See more at: http://www.linuxtechtips.com/2013/12/configure-centos-as-a-router.html#sthash.bww4gbw1.dpuf

*****

Friday, May 9, 2014

How to configure VNC in Centos

Step 1 : Install VNC and VNC-Server packages in Centos

# yum install vnc vnc-server -y


    2  sudo yum install -y  tigervnc-server tigervnc-server-module

    4  sudo yum install -y tigervnc-server-module libXfont xterm xorg-x11-twm

yum install pixman pixman-devel libfonts

Thursday, April 10, 2014

Install and Configure a Postfix Mail Server in RedHat linux

Virtual Users And Domains With Postfix, Courier, MySQL And roundcube (CentOS 6.3 x86_64)


This document describes how to install a Postfix mail server that is based on virtual users and domains, i.e. users and domains that are in a MySQL database. I'll also demonstrate the installation and configuration of Courier (Courier-POP3, Courier-IMAP), so that Courier can authenticate against the same MySQL database Postfix uses.
The resulting Postfix server is capable of SMTP-AUTH and TLS and quota. Passwords are stored in encrypted form in the database. In addition to that, this tutorial covers the installation of AmavisdSpamAssassin and ClamAV so that emails will be scanned for spam and viruses. I will also show how to install Roundcube as a webmail interface so that users can read and send emails and change their passwords.

My IP address and Hostname in this tutorial :-
IP address : 192.168.1.240
Hostname : mail.in.abc.com
OS :  CentOS release 6.3 x86_64

1. Set the Hostname :

# vi    /etc/hosts
192.168.1.240    mail.in.abc.com

# :wq!

# vi    /etc/sysconfig/network
HOSTNAME="mail.in.abc.com"
# :wq!

hostname mail.in.abc.com

2. Enable Additional Repositories And Install Some Software :

First we import the GPG keys for software packages:
# rpm --import /etc/pki/rpm-gpg/RPM-GPG-KEY*

Then we enable the RPMforge and EPEL repositories on our CentOS system as lots of the packages that we are going to install in the course of this tutorial are not available in the official CentOS 6.2 repositories:

# rpm --import http://dag.wieers.com/rpm/packages/RPM-GPG-KEY.dag.txt

# cd /tmp
# wget http://pkgs.repoforge.org/rpmforge-release/rpmforge-release-0.5.2-2.el6.rf.x86_64.rpm
rpm -ivh rpmforge-release-0.5.2-2.el6.rf.x86_64.rpm

(If the above link doesn't work anymore, you can find the current version of rpmforge-release here: http://packages.sw.be/rpmforge-release/)

 rpm --import http://fedoraproject.org/static/0608B895.txt
#  wget http://dl.fedoraproject.org/pub/epel/6/x86_64/epel-release-6-8.noarch.rpm

# rpm -ivh epel-release-6-8.noarch.rpm

# yum install yum-priorities

Edit    /etc/yum.repos.d/epel.repo
# vi  /etc/yum.repos.d/epel.repo
and add the line priority=10 to the [epel] section:

[epel]
name=Extra Packages for Enterprise Linux 6 - $basearch
#baseurl=http://download.fedoraproject.org/pub/epel/6/$basearch
mirrorlist=https://mirrors.fedoraproject.org/metalink?repo=epel-6&arch=$basearch
failovermethod=priority
enabled=1
priority=10
gpgcheck=1
gpgkey=file:///etc/pki/rpm-gpg/RPM-GPG-KEY-EPEL-6
[...]


Then we update our existing packages on the system:
# yum update

Now we install some software that we need later on:
# yum groupinstall 'Development Tools'


3 Install Apache, MySQL, phpMyAdmin :

This can all be installed with one single command (including the packages we need to build Courier-IMAP):
yum install ntp httpd mysql-server php php-mysql php-mbstring rpm-build gcc mysql-devel openssl-devel cyrus-sasl-devel pkgconfig zlib-devel phpMyAdmin pcre-devel openldap-devel postgresql-devel expect libtool-ltdl-devel openldap-servers libtool gdbm-devel pam-devel gamin-devel libidn-devel db4-devel mod_ssl telnet

4 Install Courier-IMAP, Courier-Authlib, And Maildrop :

Unfortunately there are no rpm packages for Courier-IMAP, Courier-Authlib, and Maildrop, therefore we have to build them ourselves.
RPM packages should not be built as root; courier-imap will even refuse to compile if it detects that the compilation is run as the root user. Therefore we create a normal user account now (vipin in this example) and give him a password:
# useradd -m -s /bin/bash vipin
# passwd vipin

We will need the sudo command later on so that the user vipin can compile and install the rpm packages. But first, we must allow vipin to run all commands using sudo:
RUN

# visudo
In the file that opens there's a line root ALL=(ALL) ALL. Add a similar line for vipin just below that line:


[...]

## Allow root to run any commands anywhere

root    ALL=(ALL)       ALL

vipin  ALL=(ALL)       ALL

[...]

Now we are ready to build our rpm package. First become the user vipin:
# su vipin
Next we create our build environment:

$ mkdir $HOME/rpm
$ mkdir $HOME/rpm/SOURCES
$ mkdir $HOME/rpm/SPECS
$ mkdir $HOME/rpm/BUILD
$ mkdir $HOME/rpm/BUILDROOT
$ mkdir $HOME/rpm/SRPMS
$ mkdir $HOME/rpm/RPMS
$ mkdir $HOME/rpm/RPMS/i386
$ mkdir $HOME/rpm/RPMS/x86_64

$ echo "%_topdir $HOME/rpm" >> $HOME/.rpmmacros

Now we create a downloads directory and download the source files from http://www.courier-mta.org/download.php:

$ mkdir $HOME/downloads
$ cd $HOME/downloads

$ wget http://sourceforge.net/projects/courier/files/authlib/0.66.1/courier-authlib-0.66.1.tar.bz2
$ wget http://sourceforge.net/projects/courier/files/imap/4.9.3/courier-imap-4.9.3.tar.bz2
$ wget http://sourceforge.net/projects/courier/files/maildrop/2.5.5/maildrop-2.5.5.tar.bz2


(Please note that I use Courier-IMAP 4.9.3 here instead of the newer 4.10.0 because 4.10.0 depends on systemctl which exists for Fedora, but not for CentOS.)
Now (still in $HOME/downloads) we can build courier-authlib:
$ sudo rpmbuild -ta courier-authlib-0.66.1.tar.bz2

After the build process, the rpm packages can be found in /root/rpmbuild/RPMS/x86_64 (/root/rpmbuild/RPMS/i386 if you are on an i386 system). The command

$ sudo ls -l /root/rpmbuild/RPMS/x86_64shows you the available rpm packages:


[vipin@mail downloads]$ sudo ls -l /root/rpmbuild/RPMS/x86_64
total 536
-rw-r--r-- 1 root root 124124 Apr 10 17:01 courier-authlib-0.66.1-1.el6.x86_64.rpm
-rw-r--r-- 1 root root 274528 Apr 10 17:01 courier-authlib-debuginfo-0.66.1-1.el6.x86_64.rpm
-rw-r--r-- 1 root root  39268 Apr 10 17:01 courier-authlib-devel-0.66.1-1.el6.x86_64.rpm
-rw-r--r-- 1 root root  16464 Apr 10 17:01 courier-authlib-ldap-0.66.1-1.el6.x86_64.rpm
-rw-r--r-- 1 root root  11148 Apr 10 17:01 courier-authlib-mysql-0.66.1-1.el6.x86_64.rpm
-rw-r--r-- 1 root root  12140 Apr 10 17:01 courier-authlib-pgsql-0.66.1-1.el6.x86_64.rpm
-rw-r--r-- 1 root root   7412 Apr 10 17:01 courier-authlib-pipe-0.66.1-1.el6.x86_64.rpm
-rw-r--r-- 1 root root   9772 Apr 10 17:01 courier-authlib-sqlite-0.66.1-1.el6.x86_64.rpm
-rw-r--r-- 1 root root  33984 Apr 10 17:01 courier-authlib-userdb-0.66.1-1.el6.x86_64.rpm
[vipin@mail downloads]$

Select the ones you want to install, and install them like this:

$ sudo rpm -ivh /root/rpmbuild/RPMS/x86_64/courier-authlib-0.66.1-1.el6.x86_64.rpm /root/rpmbuild/RPMS/x86_64/courier-authlib-mysql-0.66.1-1.el6.x86_64.rpm /root/rpmbuild/RPMS/x86_64/courier-authlib-devel-0.66.1-1.el6.x86_64.rpm


Here the output : 


Preparing...                ########################################### [100%]
   1:courier-authlib        ########################################### [ 33%]
   2:courier-authlib-mysql  ########################################### [ 67%]
   3:courier-authlib-devel  ########################################### [100%]
[vipin@mail downloads]$


Now we go back to our downloads directory:
$ cd $HOME/downloads

Run the following commands to create required directories/change directory permissions (because otherwise the build process for Courier-Imap will fail):

$ sudo mkdir -p /var/cache/ccache/tmp
$ sudo chmod o+rwx /var/cache/ccache/
$ sudo chmod 777 /var/cache/ccache/tmp

Now run rpmbuild again, this time without sudo, otherwise the compilation will fail because it was run as root:

$ rpmbuild -ta courier-imap-4.9.3.tar.bz2


After the build process, the rpm packages can be found in $HOME/rpm/RPMS/x86_64 ($HOME/rpm/RPMS/i386 if you are on an i386 system):

$ cd $HOME/rpm/RPMS/x86_64
The command

$ ls -l

shows you the available rpm packages:


[vipin@mail x86_64]$ ls -l
total 1112
-rw-rw-r-- 1 vipin vipin 332000 Apr 10 17:19 courier-imap-4.9.3-1.x86_64.rpm
-rw-rw-r-- 1 vipin vipin 801300 Apr 10 17:19 courier-imap-debuginfo-4.9.3-1.x86_64.rpm
[vipin@mail x86_64]$


You can install courier-imap like this:

$ sudo rpm -ivh courier-imap-4.9.3-1.x86_64.rpm

Here the output : 


[sudo] password for vipin: 
Preparing...                ########################################### [100%]
   1:courier-imap           ########################################### [100%]
[vipin@mail x86_64]$


Now we go back to our downloads directory:

$ cd $HOME/downloads

and run rpmbuild again, this time to build a maildrop package:

$ sudo rpmbuild -ta maildrop-2.5.5.tar.bz2

After the build process, the rpm packages can be found in /root/rpmbuild/RPMS/x86_64 (/root/rpmbuild/RPMS/i386 if you are on an i386 system). The command

$ sudo ls -l /root/rpmbuild/RPMS/x86_64

shows you the available rpm packages:


[vipin@mail downloads]$ sudo ls -l /root/rpmbuild/RPMS/x86_64
total 1720
-rw-r--r-- 1 root root 124124 Apr 10 17:01 courier-authlib-0.66.1-1.el6.x86_64.rpm
-rw-r--r-- 1 root root 274528 Apr 10 17:01 courier-authlib-debuginfo-0.66.1-1.el6.x86_64.rpm
-rw-r--r-- 1 root root  39268 Apr 10 17:01 courier-authlib-devel-0.66.1-1.el6.x86_64.rpm
-rw-r--r-- 1 root root  16464 Apr 10 17:01 courier-authlib-ldap-0.66.1-1.el6.x86_64.rpm
-rw-r--r-- 1 root root  11148 Apr 10 17:01 courier-authlib-mysql-0.66.1-1.el6.x86_64.rpm
-rw-r--r-- 1 root root  12140 Apr 10 17:01 courier-authlib-pgsql-0.66.1-1.el6.x86_64.rpm
-rw-r--r-- 1 root root   7412 Apr 10 17:01 courier-authlib-pipe-0.66.1-1.el6.x86_64.rpm
-rw-r--r-- 1 root root   9772 Apr 10 17:01 courier-authlib-sqlite-0.66.1-1.el6.x86_64.rpm
-rw-r--r-- 1 root root  33984 Apr 10 17:01 courier-authlib-userdb-0.66.1-1.el6.x86_64.rpm
-rw-r--r-- 1 root root 286528 Apr 10 17:28 maildrop-2.5.5-1.x86_64.rpm
-rw-r--r-- 1 root root 751404 Apr 10 17:28 maildrop-debuginfo-2.5.5-1.x86_64.rpm
-rw-r--r-- 1 root root 102084 Apr 10 17:28 maildrop-devel-2.5.5-1.x86_64.rpm
-rw-r--r-- 1 root root  65924 Apr 10 17:28 maildrop-man-2.5.5-1.x86_64.rpm
[vipin@mail downloads]$ 


You can now install maildrop like this:

$ sudo rpm -ivh /root/rpmbuild/RPMS/x86_64/maildrop-2.5.5-1.x86_64.rpm

After you have compiled and installed all needed packages, you can become root again by typing

$ exit


5 Apply Quota Patch To Postfix :

We have to get the Postfix source rpm, patch it with the quota patch, build a new Postfix rpm package and install it.

# cd /usr/src
# wget http://vault.centos.org/6.2/os/Source/SPackages/postfix-2.6.6-2.2.el6_1.src.rpm
rpm -ivh postfix-2.6.6-2.2.el6_1.src.rpm

The last command will show some warnings that you can ignore:

warning: group mockbuild does not exist - using root
warning: user mockbuild does not exist - using root

# cd /root/rpmbuild/SOURCES
# wget http://vda.sourceforge.net/VDA/postfix-2.6.5-vda-ng.patch.gz
# gunzip postfix-2.6.5-vda-ng.patch.gz
# cd /root/rpmbuild/SPECS/

Now we must edit the file postfix.spec:
# vi postfix.spec

Add Patch0: postfix-2.6.5-vda-ng.patch to the # Patches stanza, and %patch0 -p1 -b .vda-ng to the %setup -q stanza:


[...]
# Patches

Patch0: postfix-2.6.5-vda-ng.patch
Patch1: postfix-2.6.1-config.patch
Patch2: postfix-2.6.1-files.patch
Patch3: postfix-alternatives.patch
Patch8: postfix-large-fs.patch
Patch9: pflogsumm-1.1.1-datecalc.patch
Patch10: postfix-2.6.6-CVE-2011-0411.patch
Patch11: postfix-2.6.6-CVE-2011-1720.patch
[...]
%prep
%setup -q
# Apply obligatory patches
%patch0 -p1 -b .vda-ng
%patch1 -p1 -b .config
%patch2 -p1 -b .files
%patch3 -p1 -b .alternatives
%patch8 -p1 -b .large-fs
[...]

Then we build our new Postfix rpm package with quota and MySQL support:

# rpmbuild -ba postfix.spec

Our Postfix rpm package is created in /root/rpmbuild/RPMS/x86_64 (/root/rpmbuild/RPMS/i386 if you are on an i386 system), so we go there:

# cd /root/rpmbuild/RPMS/x86_64

The command

# ls -l

shows you the available packages:


[root@mail x86_64]# ls -l
total 10736
-rw-r--r-- 1 root root  124124 Apr 10 17:01 courier-authlib-0.66.1-1.el6.x86_64.rpm
-rw-r--r-- 1 root root  274528 Apr 10 17:01 courier-authlib-debuginfo-0.66.1-1.el6.x86_64.rpm
-rw-r--r-- 1 root root   39268 Apr 10 17:01 courier-authlib-devel-0.66.1-1.el6.x86_64.rpm
-rw-r--r-- 1 root root   16464 Apr 10 17:01 courier-authlib-ldap-0.66.1-1.el6.x86_64.rpm
-rw-r--r-- 1 root root   11148 Apr 10 17:01 courier-authlib-mysql-0.66.1-1.el6.x86_64.rpm
-rw-r--r-- 1 root root   12140 Apr 10 17:01 courier-authlib-pgsql-0.66.1-1.el6.x86_64.rpm
-rw-r--r-- 1 root root    7412 Apr 10 17:01 courier-authlib-pipe-0.66.1-1.el6.x86_64.rpm
-rw-r--r-- 1 root root    9772 Apr 10 17:01 courier-authlib-sqlite-0.66.1-1.el6.x86_64.rpm
-rw-r--r-- 1 root root   33984 Apr 10 17:01 courier-authlib-userdb-0.66.1-1.el6.x86_64.rpm
-rw-r--r-- 1 root root  286528 Apr 10 17:28 maildrop-2.5.5-1.x86_64.rpm
-rw-r--r-- 1 root root  751404 Apr 10 17:28 maildrop-debuginfo-2.5.5-1.x86_64.rpm
-rw-r--r-- 1 root root  102084 Apr 10 17:28 maildrop-devel-2.5.5-1.x86_64.rpm
-rw-r--r-- 1 root root   65924 Apr 10 17:28 maildrop-man-2.5.5-1.x86_64.rpm
-rw-r--r-- 1 root root 2137656 Apr 15 13:07 postfix-2.6.6-2.2.el6.x86_64.rpm
-rw-r--r-- 1 root root 7027652 Apr 15 13:07 postfix-debuginfo-2.6.6-2.2.el6.x86_64.rpm
-rw-r--r-- 1 root root   61748 Apr 15 13:07 postfix-perl-scripts-2.6.6-2.2.el6.x86_64.rpm
[root@mail x86_64]#

To make sure that no version of postfix was previously installed on your system, use:

# yum remove postfix

Pick the Postfix package and install it like this:

# rpm -ivh postfix-2.6.6-2.2.el6.x86_64.rpm

6 Set MySQL Passwords And Configure phpMyAdmin : 

Start MySQL:

# chkconfig --levels 235 mysqld on
# /etc/init.d/mysqld start

Then set passwords for the MySQL root account:
# mysql_secure_installation

Here the output : 
[root@mail x86_64]# mysql_secure_installation

NOTE: RUNNING ALL PARTS OF THIS SCRIPT IS RECOMMENDED FOR ALL MySQL
      SERVERS IN PRODUCTION USE!  PLEASE READ EACH STEP CAREFULLY!


In order to log into MySQL to secure it, we'll need the current
password for the root user.  If you've just installed MySQL, and
you haven't set the root password yet, the password will be blank,
so you should just press enter here.

Enter current password for root (enter for none):
 <-- ENTER
OK, successfully used password, moving on...

Setting the root password ensures that nobody can log into the MySQL
root user without the proper authorisation.

Set root password? [Y/n]
 <-- ENTER
New password: <-- yourrootsqlpassword
Re-enter new password: <-- yourrootsqlpassword
Password updated successfully!
Reloading privilege tables..
 ... Success!


By default, a MySQL installation has an anonymous user, allowing anyone
to log into MySQL without having to have a user account created for
them.  This is intended only for testing, and to make the installation
go a bit smoother.  You should remove them before moving into a
production environment.

Remove anonymous users? [Y/n]
 <-- ENTER
 ... Success!

Normally, root should only be allowed to connect from 'localhost'.  This
ensures that someone cannot guess at the root password from the network.

Disallow root login remotely? [Y/n]
 <-- ENTER
 ... Success!

By default, MySQL comes with a database named 'test' that anyone can
access.  This is also intended only for testing, and should be removed
before moving into a production environment.

Remove test database and access to it? [Y/n]
 <-- ENTER
 - Dropping test database...
 ... Success!
 - Removing privileges on test database...
 ... Success!

Reloading the privilege tables will ensure that all changes made so far
will take effect immediately.

Reload privilege tables now? [Y/n]
 <-- ENTER
 ... Success!

Cleaning up...


All done!  If you've completed all of the above steps, your MySQL
installation should now be secure.


Thanks for using MySQL!

[root@mail x86_64]#


Now we configure phpMyAdmin. We change the Apache configuration so that phpMyAdmin allows connections not just from localhost (by commenting out the <Directory /usr/share/phpMyAdmin/> stanza):


# vi /etc/httpd/conf.d/phpMyAdmin.conf


[...]

#   Order Deny,Allow
#   Deny from All
#   Allow from 127.0.0.1
#   Allow from ::1

[...]

Then we create the system startup links for Apache and start it:

# chkconfig --levels 235 httpd on
# /etc/init.d/httpd start

Now you can direct your browser to http://mail.in.abc/phpMyAdmin/ or http://192.168.1.240/phpMyAdmin/ and log in with the user name root and your new root MySQL password.

7 Create The MySQL Database For Postfix/Courier : 

We create a database called mail:

# mysqladmin -u root -p create mail

Next, we go to the MySQL shell:

# mysql -u root -p

On the MySQL shell, we create the user mail_admin with the password  your_password (replace it with your own password) who has SELECT,INSERT,UPDATE,DELETE privileges on the mail database. This user will be used by Postfix and Courier to connect to the mail database:


GRANT SELECT, INSERT, UPDATE, DELETE ON mail.* TO 'mail_admin'@'localhost' IDENTIFIED BY 'your_password';
GRANT SELECT, INSERT, UPDATE, DELETE ON mail.* TO 'mail_admin'@'localhost.localdomain' IDENTIFIED BY 'your_password';
FLUSH PRIVILEGES;

Still on the MySQL shell, we create the tables that Postfix and Courier need:


USE mail;
CREATE TABLE domains (
domain varchar(50) NOT NULL,
PRIMARY KEY (domain) )
ENGINE=MyISAM;
CREATE TABLE forwardings (
source varchar(80) NOT NULL,
destination TEXT NOT NULL,
PRIMARY KEY (source) )
ENGINE=MyISAM;
CREATE TABLE users (
email varchar(80) NOT NULL,
password varchar(20) NOT NULL,
quota bigint(20) DEFAULT '10485760',
PRIMARY KEY (email)
) ENGINE=MyISAM;
CREATE TABLE transport (
domain varchar(128) NOT NULL default '',
transport varchar(128) NOT NULL default '',
UNIQUE KEY domain (domain)
) ENGINE=MyISAM;
quit;

As you may have noticed, with the quit; command we have left the MySQL shell and are back on the Linux shell.


The domains table will store each virtual domain that Postfix should receive emails for (e.g. in.abc.com).
domain
in.abc.com
The forwardings table is for aliasing one email address to another, e.g. forward emails for info@in.abc.com to sales@in.abc.com.
sourcedestination
info@in.abc.comsales@in.abc.com
The users table stores all virtual users (i.e. email addresses, because these mail address and user name is the same) and passwords (in encrypted form!) and a quota value for each mail box (in this example the default value is 10485760 bytes which means 10MB).
emailpasswordquota
sales@in.abc.comNo9.E4skNvGa. ("secret" in encrypted form)10485760
The transport table is optional, it is for advanced users. It allows to forward mails for single users, whole domains or all mails to another server. For example,
domaintransport
in.abc.comsmtp:[1.2.3.4]
would forward all emails for in.abc.com via the smtp protocol to the server with the IP address 1.2.3.4 (the square brackets [] mean "do not make a lookup of the MX DNS record" (which makes sense for IP addresses...). If you use a fully qualified domain name (FQDN) instead you would not use the square brackets.)

8 Configure Postfix : 


Now we have to tell Postfix where it can find all the information in the database. Therefore we have to create six text files. You will notice that I tell Postfix to connect to MySQL on the IP address 127.0.0.1 instead of localhost. This is because Postfix is running in a chroot jail and does not have access to the MySQL socket which it would try to connect if I told Postfix to use localhost. If I use 127.0.0.1 Postfix uses TCP networking to connect to MySQL which is no problem even in a chroot jail (the alternative would be to move the MySQL socket into the chroot jail which causes some other problems).
Now let's create our six text files.


1 # vi /etc/postfix/mysql-virtual_domains.cf


user = mail_admin
password = mail_admin_password
dbname = mail
query = SELECT domain AS virtual FROM domains WHERE domain='%s'
hosts = 127.0.0.1


2 # vi /etc/postfix/mysql-virtual_forwardings.cf

user = mail_admin
password = mail_admin_password
dbname = mail
query = SELECT destination FROM forwardings WHERE source='%s'
hosts = 127.0.0.1


3 # vi /etc/postfix/mysql-virtual_mailboxes.cf

user = mail_admin
password = mail_admin_password
dbname = mail
query = SELECT CONCAT(SUBSTRING_INDEX(email,'@',-1),'/',SUBSTRING_INDEX(email,'@',1),'/') FROM users WHERE email='%s'
hosts = 127.0.0.1


4 # vi /etc/postfix/mysql-virtual_email2email.cf

user = mail_admin
password = mail_admin_password
dbname = mail
query = SELECT email FROM users WHERE email='%s'
hosts = 127.0.0.1


5 # vi /etc/postfix/mysql-virtual_transports.cf
user = mail_admin
password = mail_admin_password
dbname = mail
query = SELECT transport FROM transport WHERE domain='%s'
hosts = 127.0.0.1


6 # vi /etc/postfix/mysql-virtual_mailbox_limit_maps.cf

user = mail_admin
password = mail_admin_password
dbname = mail
query = SELECT quota FROM users WHERE email='%s'
hosts = 127.0.0.1


# chmod o= /etc/postfix/mysql-virtual_*.cf

# chgrp postfix /etc/postfix/mysql-virtual_*.cf


Now we create a user and group called vmail with the home directory /home/vmail. This is where all mail boxes will be stored.

# groupadd -g 5000 vmail

# useradd -g vmail -u 5000 vmail -d /home/vmail -m


Next we do some Postfix configuration. Go sure that you replace mail.in.abc.com with a valid FQDN, otherwise your Postfix might not work properly!

# postconf -e 'myhostname = mail.in.abc.com'
# postconf -e 'mydestination = mail.in.abc.com, localhost, localhost.localdomain'
# postconf -e 'mynetworks = 127.0.0.0/8'
# postconf -e 'virtual_alias_domains ='
# postconf -e ' virtual_alias_maps = proxy:mysql:/etc/postfix/mysql-virtual_forwardings.cf, mysql:/etc/postfix/mysql-virtual_email2email.cf'
# postconf -e 'virtual_mailbox_domains = proxy:mysql:/etc/postfix/mysql-virtual_domains.cf'
# postconf -e 'virtual_mailbox_maps = proxy:mysql:/etc/postfix/mysql-virtual_mailboxes.cf'
# postconf -e 'virtual_mailbox_base = /home/vmail'
# postconf -e 'virtual_uid_maps = static:5000'
# postconf -e 'virtual_gid_maps = static:5000'
# postconf -e 'smtpd_sasl_auth_enable = yes'
# postconf -e 'broken_sasl_auth_clients = yes'
# postconf -e 'smtpd_sasl_authenticated_header = yes'
# postconf -e 'smtpd_recipient_restrictions = permit_mynetworks, permit_sasl_authenticated, reject_unauth_destination'
# postconf -e 'smtpd_use_tls = yes'
# postconf -e 'smtpd_tls_cert_file = /etc/postfix/smtpd.cert'
# postconf -e 'smtpd_tls_key_file = /etc/postfix/smtpd.key'
# postconf -e 'transport_maps = proxy:mysql:/etc/postfix/mysql-virtual_transports.cf'
# postconf -e 'virtual_create_maildirsize = yes'
# postconf -e 'virtual_maildir_extended = yes'
# postconf -e 'virtual_mailbox_limit_maps = proxy:mysql:/etc/postfix/mysql-virtual_mailbox_limit_maps.cf'
# postconf -e 'virtual_mailbox_limit_override = yes'
# postconf -e 'virtual_maildir_limit_message = "The user you are trying to reach is over quota."'
# postconf -e 'virtual_overquota_bounce = yes'
# postconf -e 'proxy_read_maps = $local_recipient_maps $mydestination $virtual_alias_maps $virtual_alias_domains $virtual_mailbox_maps $virtual_mailbox_domains $relay_recipient_maps $relay_domains $canonical_maps $sender_canonical_maps $recipient_canonical_maps $relocated_maps $transport_maps $mynetworks $virtual_mailbox_limit_maps'
# postconf -e 'inet_interfaces = all'


 Afterwards we create the SSL certificate that is needed for TLS:

# cd /etc/postfix
# openssl req -new -outform PEM -out smtpd.cert -newkey rsa:2048 -nodes -keyout smtpd.key -keyform PEM -days 365 -x509


Country Name (2 letter code) [XX]: <-- Enter your Country Name (e.g., "IN").
State or Province Name (full name) []: <-- Enter your State or Province Name.
Locality Name (eg, city) [Default City]: <-- Enter your City.
Organization Name (eg, company) [Default Company Ltd]: <-- Enter your Organization Name (e.g., the name of your company).
Organizational Unit Name (eg, section) []: <-- Enter your Organizational Unit Name (e.g. "IT Department").
Common Name (eg, your name or your server's hostname) []: <-- Enter the Fully Qualified Domain Name of the system (e.g. "mail.abc.com").
Email Address []: <-- Enter your Email Address.


Then change the permissions of the smtpd.key:

# chmod o= /etc/postfix/smtpd.key


9 Configure Saslauthd


Edit /etc/sasl2/smtpd.conf. It should look like this:

# vi /etc/sasl2/smtpd.conf

pwcheck_method: authdaemond
log_level: 3
mech_list: PLAIN LOGIN
authdaemond_path:/var/spool/authdaemon/socket


Note : Please comment other lines

Then turn off Sendmail and start Postfix, saslauthd, and courier-authlib:

# chmod 755 /var/spool/authdaemon
# chkconfig --levels 235 courier-authlib on
# /etc/init.d/courier-authlib start

# chkconfig --levels 235 sendmail off
# chkconfig --levels 235 postfix on
# chkconfig --levels 235 saslauthd on
# /etc/init.d/sendmail stop
# /etc/init.d/postfix start
# /etc/init.d/saslauthd start


10 Configure Courier


Now we have to tell Courier that it should authenticate against our MySQL database. First, edit /etc/authlib/authdaemonrc and change the value of authmodulelist so that it reads

# vi /etc/authlib/authdaemonrc

[...]
authmodulelist="authmysql"
#authmodulelist="authuserdb authpam authpgsql authldap authmysql authcustom authpipe"
[...]


Then edit /etc/authlib/authmysqlrc. It should look exactly like this (again, make sure to fill in the correct database details):

# cp /etc/authlib/authmysqlrc /etc/authlib/authmysqlrc_orig
# cat /dev/null > /etc/authlib/authmysqlrc

 # vi /etc/authlib/authmysqlrc

MYSQL_SERVER localhost
MYSQL_USERNAME mail_admin
MYSQL_PASSWORD mail_admin_password
MYSQL_PORT 0
MYSQL_DATABASE mail
MYSQL_USER_TABLE users
MYSQL_CRYPT_PWFIELD password
#MYSQL_CLEAR_PWFIELD password
MYSQL_UID_FIELD 5000
MYSQL_GID_FIELD 5000
MYSQL_LOGIN_FIELD email
MYSQL_HOME_FIELD "/home/vmail"
MYSQL_MAILDIR_FIELD CONCAT(SUBSTRING_INDEX(email,'@',-1),'/',SUBSTRING_INDEX(email,'@',1),'/')
#MYSQL_NAME_FIELD
MYSQL_QUOTA_FIELD quota

Then restart Courier:

# chkconfig --levels 235 courier-imap on
# /etc/init.d/courier-authlib restart
# /etc/init.d/courier-imap restart

When courier-imap is started for the first time, it automatically creates the certificate files /usr/lib/courier-imap/share/imapd.pem and /usr/lib/courier-imap/share/pop3d.pem from the /usr/lib/courier-imap/etc/imapd.cnf and /usr/lib/courier-imap/etc/pop3d.cnf files. Because the .cnf files contain the line CN=localhost, but our server is named mail.abc.com, the certificates might cause problems when you use TLS connections. To solve this, we delete both certificates...

# cd /usr/lib/courier-imap/share
# rm -f imapd.pem
# rm -f pop3d.pem

... and replace the CN=localhost lines in /usr/lib/courier-imap/etc/imapd.cnf and /usr/lib/courier-imap/etc/pop3d.cnf with CN=mail.abc.com:

# vi /usr/lib/courier-imap/etc/imapd.cnf

[...]
CN=mail.abc.com
[...]

# vi /usr/lib/courier-imap/etc/pop3d.cnf


#XXXXX#